
Overview
A self-hosted server typically isn’t assigned a static public IP address, which means that its IPs change periodically, preventing stable access to the server. While it is quite difficult requiring your ISP (internet service provider) to fix your IP address, it is practical to bind your IP to a domain, and keep the bound IP updated whenever it changes. That is the idea of DDNS, dynamic domain name system.
I have tried two methods realizing DDNS, First I tried a DDNS provider (dynv6.com) with ddclient; later I found that Cloudflare provides APIs to update DNS, which means that you only need to write a shell script to check your IP periodically and update the DNS using the API when necessary.
dynv6.com + ddclient
First you need to visit dynv6.com, sign up for an account, then you could create a domain ending with like .dns.army, dynv6.net or something, which points to your real IP address. After you’ve created a DDNS domain, turn to the instruction page, where a snippet for ddclient set-up is provided below like this:
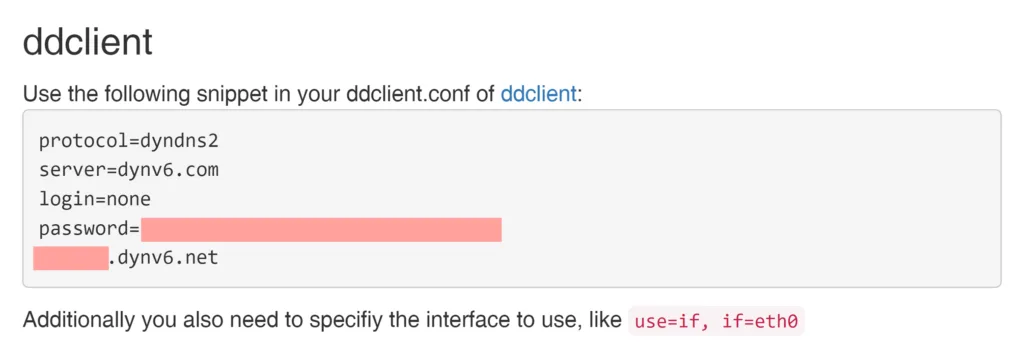
Then we need to set up ddclient to keep the IP updated. The GitHub page for ddclient is here https://github.com/ddclient/ddclient. Just follow the instructions in the readme file for installation.
After that, you could set your main domain a CNAME of the DDNS domain. By doing so, when someone tries to visit your main domain, the DNS provider redirects the request to the DDNS domain, which returns the real IP address.
This method works, but it has two drawbacks. You need a intermediate DDNS domain which is a drawback of the speed. Also, there are some problems for ddclient to handle IPv6 address.
Cloudflare
I didn’t start using Cloudflare because of the DDNS; instead, Cloudflare does not indicate it has a ready-for-use DDNS service. I started using it because of its CDN (content distribution network) service, which globally distributes your website so that the visiting performance would be improved. I’ll talk about the CDN maybe later in another blog.
It was after I switched my DNS server to Cloudflare did I realize ddclient is also compatible with Cloudflare as well, so I modified my ddclient setup for Cloudflare, eliminating the intermediate domain.
Later I found that Cloudflare provides APIs to update DNS records, which means that ddclient is no longer needed as well.
My solution
The following method mainly refers to the by Rohan Jain. however it was written 6 years ago, some of the links and codes are no longer available; plus, I made some minor modifications to the original content so that it fits my current situation.
The API documentation is here: https://developers.cloudflare.com/api/operations/dns-records-for-a-zone-update-dns-record
You need to put a curl request as follows:
curl --request PUT \
  --url https://api.cloudflare.com/client/v4/zones/zone_identifier/dns_records/identifier \
  --header 'Content-Type: application/json' \
  --header 'X-Auth-Email: ' \
  --data '{
  "content": "your_ip_address",
  "name": "you_domain.com",
  "proxied": true,
  "type": "AAAA",
}'There are some key parameters to take care. I’ll break them down in the following:
Zone Identifier
Enter the dashboard of your domain on Cloudflare, usually with a URL like “https://dash.cloudflare.com/<your_account_id>/<your_domain>”, it’s on the bottom-right side, above your account id. Both of them is a 32-digit string, composed of numbers and lowercase letters.
Or you can refer to the official doc: https://developers.cloudflare.com/fundamentals/setup/find-account-and-zone-ids/
DNS Record Identifier
It’s a bit hard to get the DNS record id, that is, the “identifier” in the curl request. To get this, we need another API to list them all. Here is the documentation: https://developers.cloudflare.com/api/operations/dns-records-for-a-zone-list-dns-records
Similarly, we also need to put a curl request:
curl --request GET \
  --url https://api.cloudflare.com/client/v4/zones/zone_identifier/dns_records \
  --header 'Content-Type: application/json' \
--header 'X-Auth-Email: 'The zone identifier is what I’ve stated above. Then you need to find a method for authentication. Simply put, there are two methods, global API, or API token for a special purpose. Here as we only need to run this command once, there is no need to generate an API token, so I’ve chosen to use the global API key. You can find it here:
https://dash.cloudflare.com/profile/api-tokens
Then add two lines in the curl request:
  --header 'X-Auth-Email: [email protected]'
--header 'X-Auth-Key: your_global_api_key'Run it, then you would be able to find the DNS record id in the response message, it’s also a 32-digit string the same format as your zone id.
Authentication and API Token
I just mentioned the global API key. However, as the script updating IP address would be stored in my server and be automatically executed, it becomes dangerous to use the global key. So we need to create a token specially for this. It’s like the one-time password for POP3/IMAP in mail services.
In the very same page, https://dash.cloudflare.com/profile/api-tokens, “Create Token” -> “Edit zone DNS”. Or you could refer to the official doc: https://developers.cloudflare.com/fundamentals/api/get-started/create-token/
Then the authentication would be written like this:
--header "Authorization: Bearer your_api_token"If you would like to discover more about authentication, the documentation is here: https://developers.cloudflare.com/api/
Way to Obtain your Current IP
In short, there are two methods: from your device, or from the web. As I have no public IPv4 address, plus all IPv6 address are public, there is no need to use the web method if your server is in a pure IPv6 environment. The specific command vary depending on your device. You can ask ChatGPT to write a command using ip addr plus grep with regex to extract your IP. Here is my code:
ip addr show dev eth0 | grep -o -P '(?<=inet6\s)[\w:]+' | sed -n '1p'cloudflare-ddns.sh
The whole script would be placed at /usr/local/bin/cloudflare-ddns.sh:
#/usr/bin/env sh

# Docs: https://developers.cloudflare.com/api/operations/dns-records-for-a-zone-update-dns-record

# Get the Zone ID from: https://dash.cloudflare.com/<account_id>/<domain.name>
ZONE_IDENTIFIER="<your_zone_id>"

# Get the existing identifier for DNS entry:
# https://developers.cloudflare.com/api/operations/dns-records-for-a-zone-list-dns-records
IDENTIFIER="<your_dns_id>"

# Use API token for authenticate: https://dash.cloudflare.com/profile/api-tokens
API_TOKEN="<your_api_token>"

# Desired domain name
DOMAIN_NAME="your_domain.com"

# Get previous IP address
_PREV_IP_FILE="/tmp/previous-ip.txt"
_PREV_IP=$(cat $_PREV_IP_FILE)

# Get current IP address
_IP=$(ip addr show dev eth0 | grep -o -P '(?<=inet6\s)[\w:]+' | sed -n '1p')

# Get current time for logging
_CURRENT_TIME=$(TZ="Asia/Taipei" date +"%Y-%m-%d %H:%M:%S")

# If new/previous IPs match, no need for an update.
if [ "$_IP" = "$_PREV_IP" ]; then
    exit 0
fi

_UPDATE=$(
    cat <<EOF
{
  "content": "$_IP",
  "name": "$DOMAIN_NAME",
  "proxied": true,
  "type": "AAAA",
  "ttl": 1
}
EOF
)

curl --request PUT \
    --url https://api.cloudflare.com/client/v4/zones/$ZONE_IDENTIFIER/dns_records/$IDENTIFIER \
    --header 'Content-Type: application/json' \
    --header "Authorization: Bearer $API_TOKEN" \
    --data "$_UPDATE" >/tmp/cloudflare-ddns-update.json &&
    echo $_IP >$_PREV_IP_FILE

echo "[$_CURRENT_TIME]: IP changed to [$_IP]." >>/tmp/cloudflare-ddns-ip-updates.log
Note we make a comparison to the IP last updated before trying to make another update. If the IP did not change, then we don’t need to send a curl request. A previous IP file needs to be created before running the script for the first time:
echo $(ip addr show dev eth0 | grep -o -P '(?<=inet6\s)[\w:]+' | sed -n '1p') >/tmp/previous-ip.txtConfigure the Service
Next, write a .service file in /etc/systemd/system/cloudflare-ddns.service
[Unit]
Description=Update DNS entry for this host to current IP

[Service]
Type=oneshot
ExecStart=/bin/sh /usr/local/bin/cloudflare-ddns.sh
Try to start the service by:
sudo systemctl start cloudflare-ddns.service
# Check the results:
sudo journalctl -u cloudflare-ddnsSet up a Timer
I placed my .timer file in /etc/systemd/system/cloudflare-ddns.timer, so that the original .sh script would be automatically executed every 2 minutes.
[Unit]
Description=Update DNS entry in cloudflare every 2 minutes
[Timer]
OnBootSec=1min
OnCalendar=*:0/2
Unit=cloudflare-ddns.service
[Install]
WantedBy=basic.targetTo enable the timer, run:
sudo systemctl enable cloudflare-ddns.timerThis makes the timer start automatically when the server reboots. It does not mean that this service is started right now, so we need to force it start:
sudo systemctl start cloudflare-ddns.timerAny changes applied
If you applied changes to your cloudflare-ddns.sh script, the timer unit should be reloaded and restarted:
sudo systemctl daemon-reload
sudo systemctl restart cloudflare-ddns.timer
sudo systemctl restart cloudflare-ddns.service
Leave a Reply
You must be logged in to post a comment.